Cara Sharing Printer Canon
by : Agus LH / lhagus813@gmail.com
Pada kesempatan kali ini, saya post tentang Cara Sharing Printer Canon. Bagi rekan rekan Tuser ataupun yang sedang mencari pada mesin telusur mbah google, saya ucapkan terima kasih atas waktu luang anda, Kenapa saya post terkait judul Cara Sharing Printer Canon ? Karena, 1. Untuk melawan lupa jika terjadi error pada perangkat komputer , printer dan pendukungnya. 2. Sebagai media catatan virtual yang dapat dijadikan media belajar bersama sekaligus koreksi dan balik lagi ke point 1. Langsung saja Cara Sharing Printer Canon sebagai berikut berdasarkan sumber gambar tulisan dan bahasa dari sumbernya langsung (F.A.Q Cannon support center).
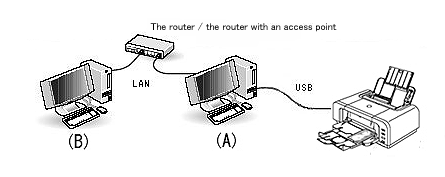
ENGLISH VERSION
(A) Print sever
(B) Client PC
REFERENCE
The computer directly connected to the printer
with a USB cable is called "Print server" (A) and the computer on which
printing operation is actually performed is called "Client PC."
<Setup flow>
Follow the steps below to enable printer sharing.
1. Complete the printer sharing settings on the Printer server.
2. Confirm the computer name of the print server.
3. Add the printer to be shared to the client PC as a new printer.
CAUTION
Log in as an Administrator to perform the setup.
Canon iP4700 Series is used as an example of the printer to be shared.
- Preparations -
Both Print server and Client PC must have
either of the following drivers installed, namely the one downloaded
from Canon website or the one included in the OS. Which driver you
should install in depends on the printer / OS.
For details, see our website.
- To install the downloaded driver in the client PC, check "Select printer port" in the Installation Complete window, then select LPT1 in "Manual Selection" to complete the installation.
- To install the driver included in the OS in the client PC, select LPT1 in "Add Printer" to complete the installation.
1. Complete the printer sharing settings on the Printer server.
Let's make the printer connected to the print server available to other computers.
1-1. From the Start menu, select [Devices and Printers] .
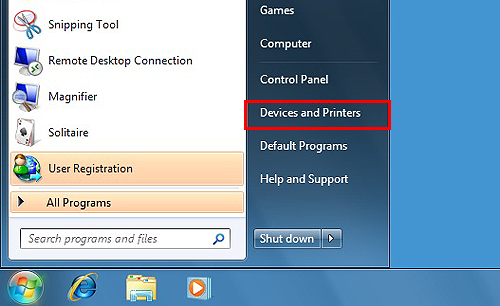
REFERENCE
The screen looks different depending on the environment you are using.
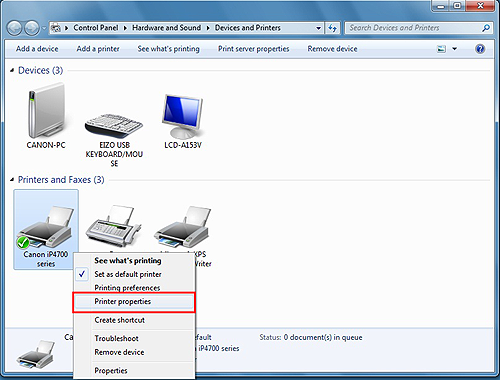
1-2. Right-click the Canon iP4700 Series icon, then select "Printer Properties" .
1-3. Select the Sharing tab, check "Share this
printer", and then enter the name of the printer you want to share in
"Share name".
After you enter the name, click "Apply" then "OK" to close Properties.
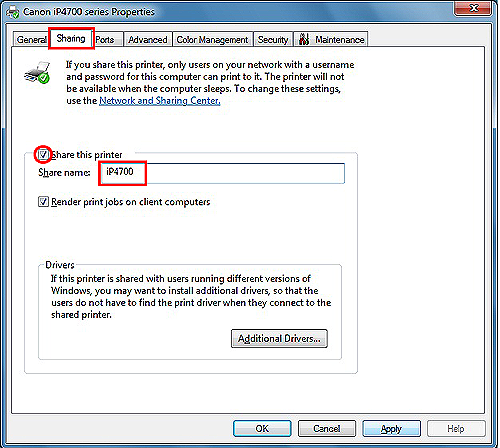
IMPORTANT
- The iP4700 is an example.
- Make sure to write down the "words" you entered in Share name. You will need it when doing the setup for the client server.
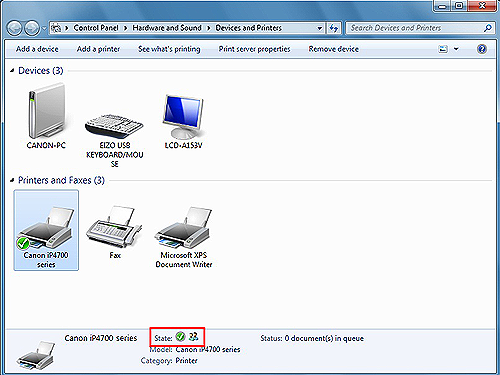
1-4. Confirm that the following kind of mark is displayed in "State" in the bottom of the window.
2. This is necessary when you specify the printer in the step 3 below.
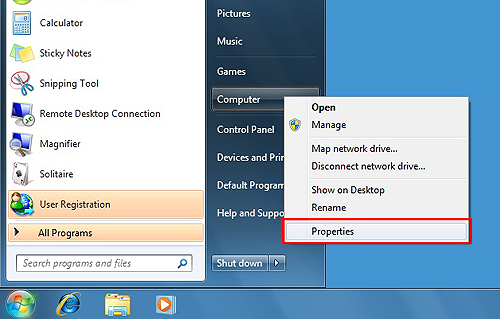
2-1. From the Start menu, right-click "Computer", then click "Properties".
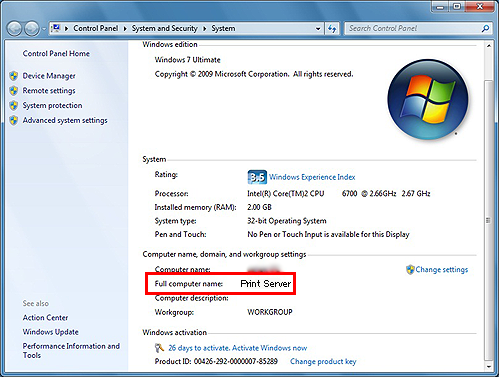
2-2. Confirm the Full computer name.
IMPORTANT
"Print Server" is an example.
Make sure to write down the "words" in Full computer name. You will need it when doing the setup for the client server.
3. Add the printer to the client PC as a new printer.
Make the client PC recognize the printer on the network.
3-1. From the Start menu, select "Computer", "Network", then "Add a printer".
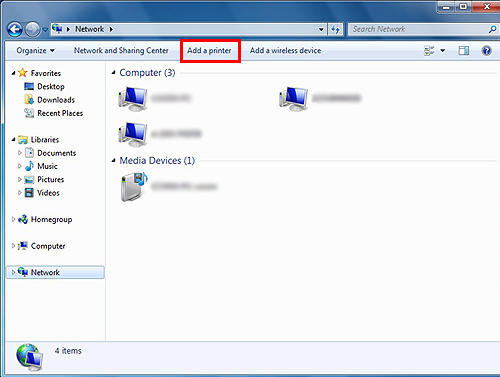
The Add Printer window is displayed.
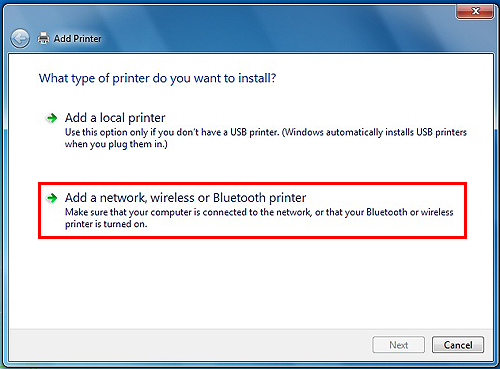
3-2. Select "Add a network, wireless or Bluetooth printer".
3-3. Click the icon of the printer specified on the print server, click "Next".
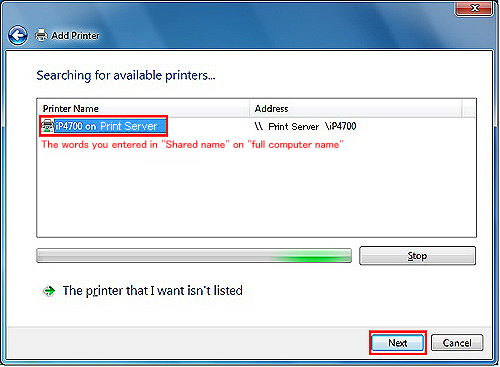
IMPORTANT
If the printer icon is not displayed, check
the connection with the print server. If the problem persists, confirm
whether the account (administrative privileges) of the print server is
surely specified on the client PC.
(It may take time to display the printer icon.)
3-4. After following the instructions on the window, click "Finish".
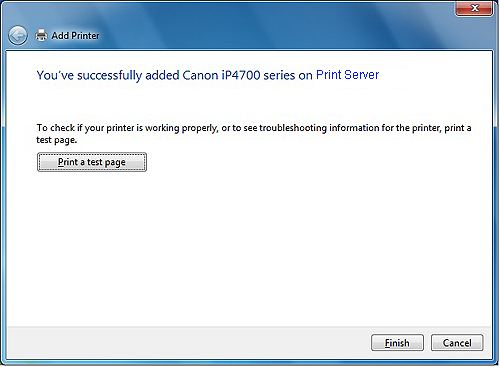
The end of all the settings.
Canon iP4600 Series is used as an example of the printer to be shared.
- Preparations -
Both Print server and Client PC must have
either of the following drivers installed, namely the one downloaded
from Canon website or the one included in the OS. Which driver you
should install in depends on the printer / OS.
For details, see our website.
- To install the downloaded driver in the client PC, check "Select printer port" in the Installation Complete window, then select LPT1 in "Manual Selection" to complete the installation.
- To install the driver included in the OS in the client PC, select LPT1 in "Add Printer" to complete the installation.
1. Complete the printer sharing settings on the Printer server.
Let's make the printer connected to the print server available to other computers.
1-1. From the Start menu, select "Devices and Printers" .

REFERENCE
The screen looks different depending on the environment you are using.
1-2. Right-click the Canon iP4600 Series icon, then select "Printer Properties"
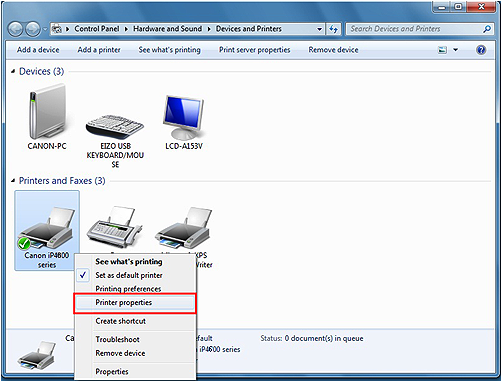
1-3. Select the Sharing tab, check "Share this
printer", and then enter the name of the printer you want to share in
"Share name".
After you enter the name, click "Apply" then "OK" to close Properties.
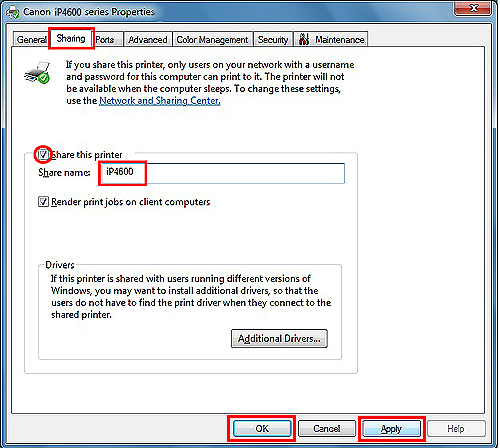
IMPORTANT
- The Canon iP4600 Series is an example.
- Make sure to write down the "words" you entered in Share name. You will need it when doing the setup for the client server.
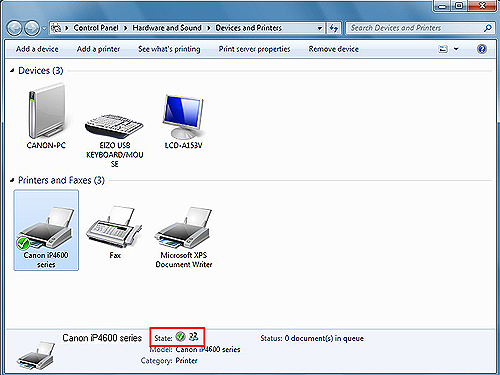
1-4. Confirm that the following kind of mark
is displayed in "State" in the bottom of the window. In this case, the
mark indicates that iP4600 series get ready to be shared.
2. Confirm the full computer name of the print server.
This is necessary when you specify the printer in the step 3 below.
2-1. From the Start menu, right-click "Computer", then click "Properties".

2-2. Confirm the Full computer name.

IMPORTANT
"Print Server" is an example.
Make sure to write down the "words" in Full computer name. You will need it when doing the setup for the client server.
3. Add a shared printer to the client PC as a new printer.
Add a shared printer on the network to the client PC as a new printer.
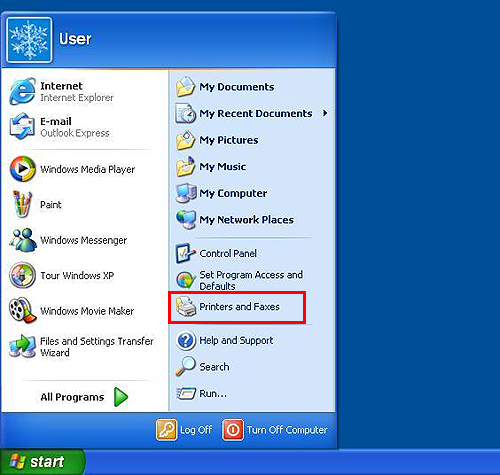
3-1. From the Start menu, select "Printers and Faxes" .
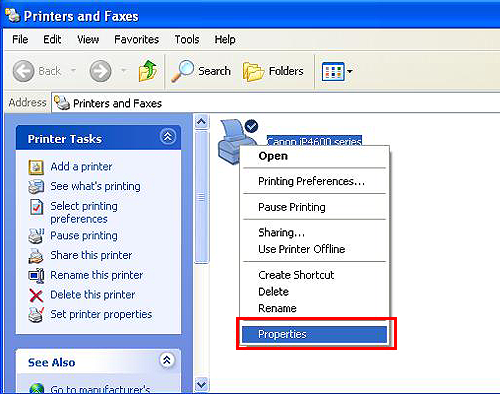
3-2. Right-click "Canon iP4600 Series" icon, then select Properties.
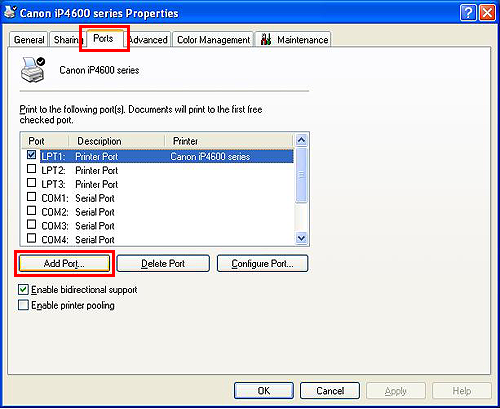
3-3. Select the "Ports" tab, then click "Add Port".
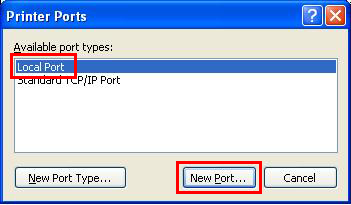
3-4. Select "Local Port" , then click "New Port".
3-5. In the "Port Name" window, enter the shared printer name following the format below, then click "OK":

 Computer name of the Print server
 Shared printer name
REFERENCE
- The computer name of the print server is the "Full computer name" you confirmed in the Step 2-2.
- The shared printer name is the name you entered in "Share name" in the Step 1-3.
- If you cannot perform the connection successfully, the sharing setting between the print server and the client PC (the setting on the OS) may not be specified properly.
In this case, Microsoft recommends that the same accounts and passwords be added
to all the computers on the network.
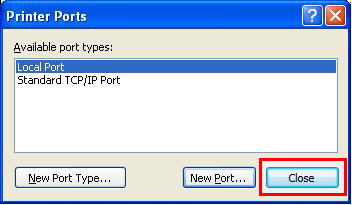
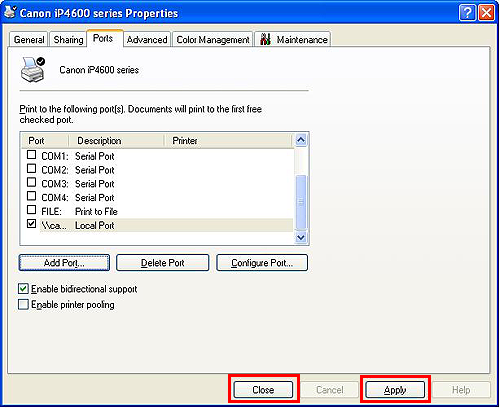
3-6. In the "Printer Port" window, select "Close", then click "Apply" → "Close" Close in "Printer ProPerties" .
The end of all the settings.
Canon iP4700 Series is used as an example of the printer to be shared.
- Preparations -
Both Print server and Client PC must have
either of the following drivers installed, namely the one downloaded
from Canon website or the one included in the OS. Which driver you
should install in depends on the printer / OS.
For details, see our website.
- To install the downloaded driver in the client PC, check "Select printer port" in the Installation Complete window, then select LPT1 in "Manual Selection" to complete the installation.
- To install the driver included in the OS in the client PC, select LPT1 in "Add Printer" to complete the installation.
1. Complete the printer sharing settings on the Printer server.
Let's make the printer connected to the print server available to other computers.
1-1. From the Start menu, select "Devices and Printers" .

REFERENCE
The screen looks different depending on the environment you are using.
1-2. Right-click the Canon iP4700 Series icon, then select "Printer Properties"
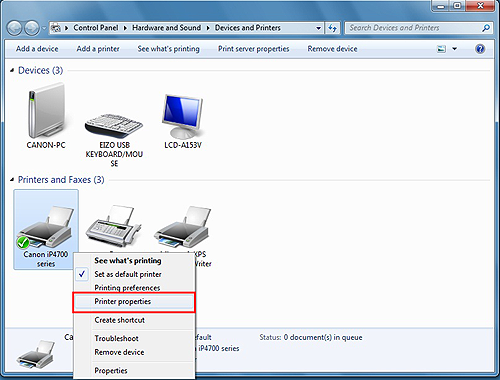
1-3. Select the Sharing tab, check "Share this
printer", and then enter the name of the printer you want to share in
"Share name".
After you enter the name, click "Apply" then "OK" to close Properties.

REFERENCE
- The Canon iP4700 Series is an example.
- Make sure to write down the "words" you entered in Share name. You will need it when doing the setup for the client server.
1-4. Confirm that the following kind of mark
is displayed in "State" in the bottom of the window. In this case, the
mark indicates that iP4700 series get ready to be shared.

2. Confirm the full computer name of the print server.
This is necessary when you specify the printer in the step 3 below.
2-1. From the Start menu, right-click "Computer", then click "Properties".

2-2. Confirm the Full computer name.

IMPORTANT
"Print Server" is an example.
Make sure to write down the "words" in Full computer name. You will need it when doing the setup for the client server.
3. Add the printer to the client PC as a new printer.
Make the client PC recognize the printer on the network.
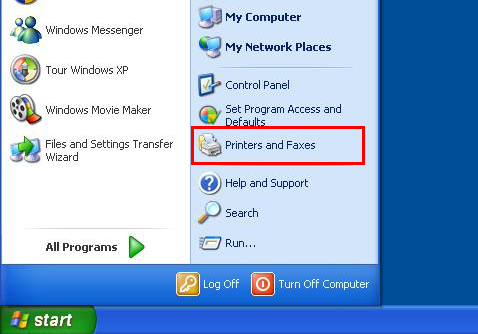
3-1. From the Start menu, select "Printers and Faxs".
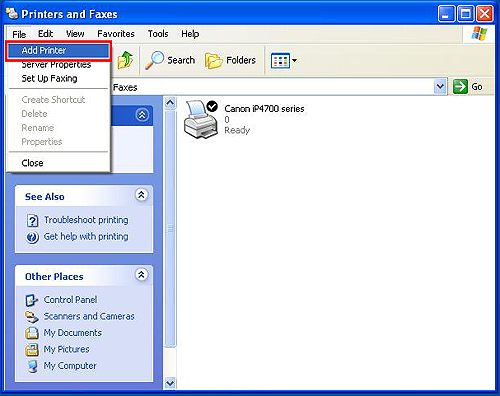
3-2. From the file menu, select Add Printer.
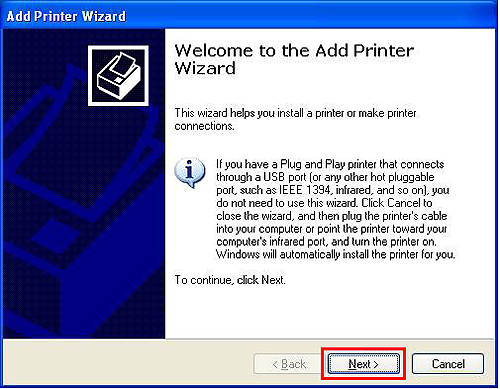
3-3. The Add Printer Wizard will be displayed.
Click Next.
3-4. Check "A network Printer, or a printer attached to another printer," then click Next.
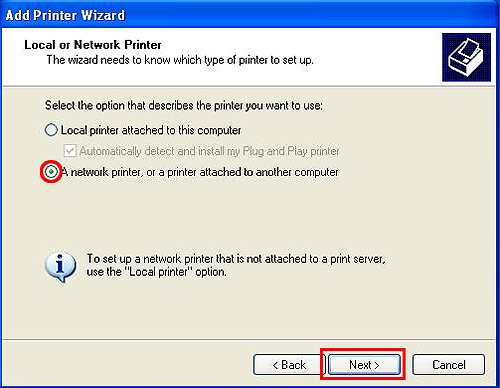
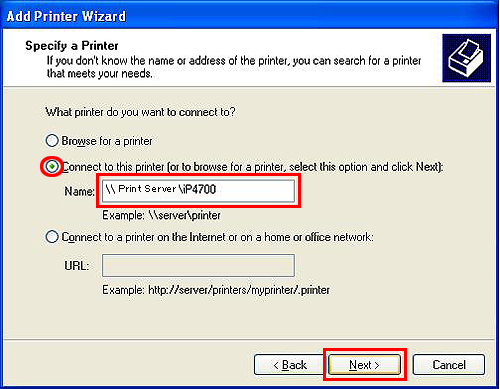
3-5. Check "Connect to this Printer (or to
browse for a printer, select this option and click Next)," enter the
full computer name and the share name you confirmed in the step 2-2 and
1-3 in "name" respectively.
Click Next.
IMPORTANT
If you cannot proceed to the next step even
after clicking Next, check the connection with the print server. If the
problem persists, confirm whether the account (administrative
privileges) of the print server is surely specified on the client PC.
(It may take time to display the printer icon.)
3-6. Click Yes.

3-7. After following the instructions on the window, click "Finish".
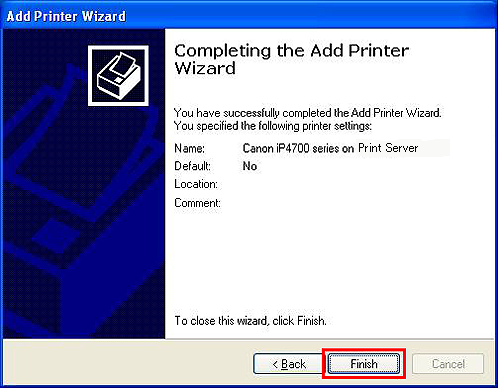
The end of all the settings.
Canon iP4600 Series is used as an example of the printer to be shared.
- Preparations -
Both Print server and Client PC must have
either of the following drivers installed, namely the one downloaded
from Canon website or the one included in the OS. Which driver you
should install in depends on the printer / OS.
For details, see our website.
- To install the downloaded driver in the client PC, check "Select printer port" in the Installation Complete window, then select LPT1 in "Manual Selection" to complete the installation.
- To install the driver included in the OS in the client PC, select LPT1 in "Add Printer" to complete the installation.
1. Complete the printer sharing settings on the Printer server.
Let's make the printer connected to the print server available to other computers.
1-1. From the Start menu, select "Devices and Printers" .

REFERENCE
The screen looks different depending on the environment you are using.
1-2. Right-click the Canon iP4600 Series icon, then select "Printer Properties"

1-3. Select the Sharing tab, check "Share this
printer", and then enter the name of the printer you want to share in
"Share name".
After you enter the name, click "Apply" then "OK" to close Properties.

IMPORTANT
- The Canon iP4600 Series is an example.
- Make sure to write down the "words" you entered in Share name. You will need it when doing the setup for the client server.
1-4. Confirm that the following kind of mark
is displayed in "State" in the bottom of the window. In this case, the
mark indicates that iP4600 series get ready to be shared.

2. Confirm the full computer name of the print server.
This is necessary when you specify the printer in the step 3 below.
2-1. From the Start menu, right-click "Computer", then click "Properties".

2-2. Confirm the Full computer name.

IMPORTANT
"Print Server" is an example.
Make sure to write down the "words" in Full computer name. You will need it when doing the setup for the client server.
3. Complete the printer sharing settings on the Printer server.
Let's make the printer connected to the print server available to other computers.
3-1. From the Start menu, select "Control Panel", "Hardware and Sound", then "Printers".
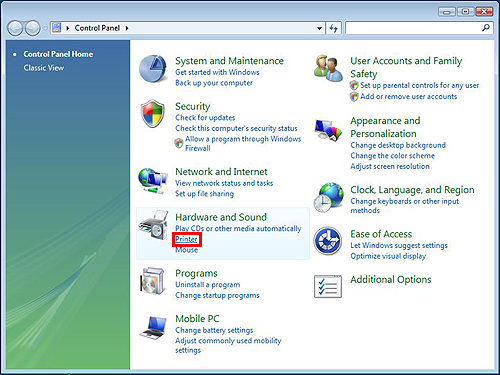
3-2. Right-click the "Canon iP4600 Series" icon, then select "Properties".

3-3. Select the "Ports" tab, then click "Add Port".

3-4. Select "Local Port" then click "New Port".

3-5. In the "Port Name" window, enter the shared printer name following the format below, then click "OK" :

 Computer name of the Print server
 Shared printer name
REFERENCE
- The computer name of the print server is the "Full computer name" you confirmed in the Step 2-2.
- The shared printer name is the name you entered in "Share name" in the Step 1-3.
- If you cannot perform the connection successfully, the sharing setting between the print server and the client PC (the setting on the OS) may not be specified properly.
In this case, Microsoft recommends that the same accounts and passwords be added to all the computers on the network.
3-6. In the "Printer Port" window, select "Close", then click "Apply" → "Close" in "Printer ProPerties" .


The end of all the settings.
Canon iP4700 Series is used as an example of the printer to be shared.
- Preparations -
Both Print server and Client PC must have
either of the following drivers installed, namely the one downloaded
from Canon website or the one included in the OS. Which driver you
should install in depends on the printer / OS.
For details, see our website.
- To install the downloaded driver in the client PC, check "Select printer port" in the Installation Complete window, then select LPT1 in "Manual Selection" to complete the installation.
- To install the driver included in the OS in the client PC, select LPT1 in "Add Printer" to complete the installation.
1. Complete the printer sharing settings on the Printer server.
Let's make the printer connected to the print server available to other computers.
1-1. From the Start menu, select [Devices and Printers] .

REFERENCE
The screen looks different depending on the environment you are using.
1-2. Right-click the Canon iP4700 Series icon, then select "Printer Properties" .

1-3. Select the Sharing tab, check "Share this
printer", and then enter the name of the printer you want to share in
"Share name".
After you enter the name, click "Apply" then "OK" to close Properties.

IMPORTANT
- The iP4700 is an example.
- Make sure to write down the "words" you entered in Share name. You will need it when doing the setup for the client server.
1-4. Confirm that the following kind of mark is displayed in "State" in the bottom of the window.

2. This is necessary when you specify the printer in the step 3 below.
2-1. From the Start menu, right-click "Computer", then click "Properties".

2-2. Confirm the Full computer name.

IMPORTANT
"Print Server" is an example.
Make sure to write down the "words" in Full computer name. You will need it when doing the setup for the client server.
3. Add the printer to the client PC as a new printer.
Make the client PC recognize the printer on the network.
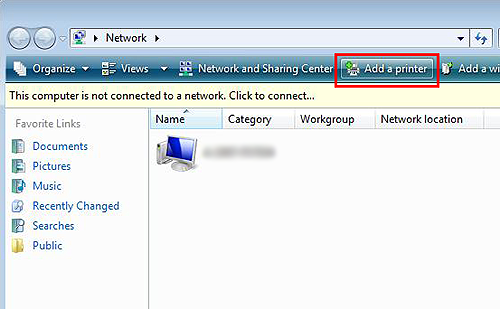
3-1. From the Start menu, select "Network", then "Add a printer".
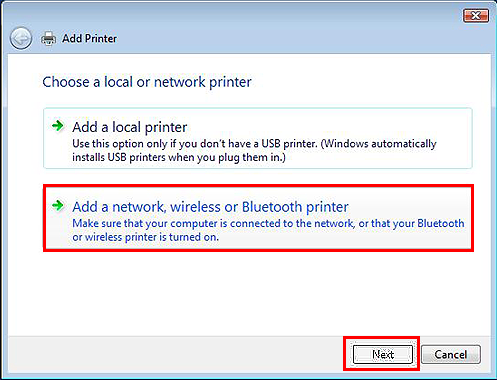
3-2. Select "Add a network, wireless or Bluetooth printer," then click Next.
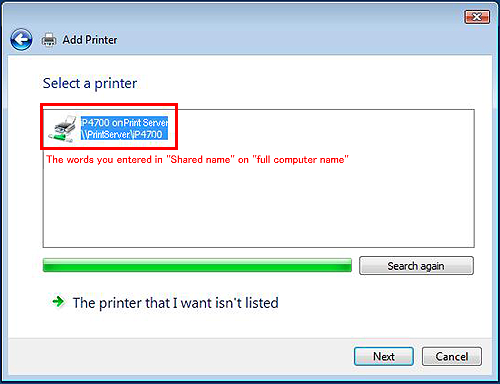
3-3. Click the icon of the printer specified on the print server, click "Next".
IMPORTANT
If the printer icon is not displayed, check
the connection with the print server. If the problem persists, confirm
whether the account (administrative privileges) of the print server is
surely specified on the client PC.
(It may take time to display the printer icon.)
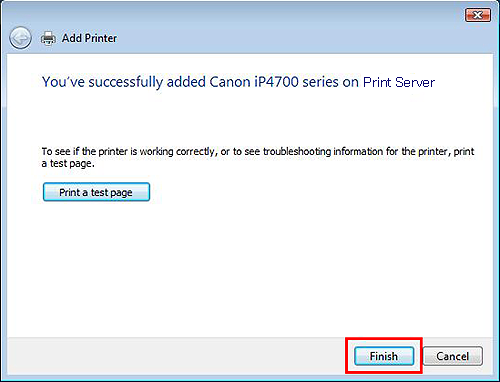
3-4. After following the instructions on the window, click "Finish".
The end of all the settings.
Canon iP4700 Series is used as an example of the printer to be shared.
- Preparations -
Both Print server and Client PC must have
either of the following drivers installed, namely the one downloaded
from Canon website or the one included in the OS. Which driver you
should install in depends on the printer / OS.
For details, see our website.
- To install the downloaded driver in the client PC, check "Select printer port" in the Installation Complete window, then select LPT1 in "Manual Selection" to complete the installation.
- To install the driver included in the OS in the client PC, select LPT1 in "Add Printer" to complete the installation.
1. Complete the printer sharing settings on the Printer server.
Let's make the printer connected to the print server available to other computers.
1-1. From the Start menu, select "Control Panel", "Hardware and Sound", then "Printers".
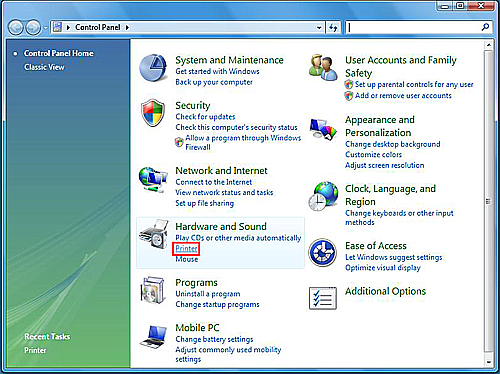
The Printer window is displayed.
REFERENCE
The screen looks different depending on the environment you are using.
1-2. Right-click the Canon iP4700 Series icon, then select "Sharing".
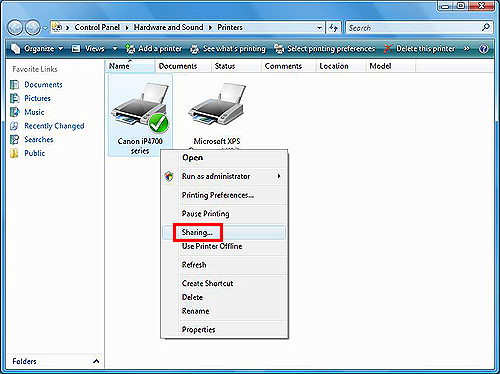
The Properties of the printer is displayed.
1-3. Click "Change sharing options" in the Sharing tab.
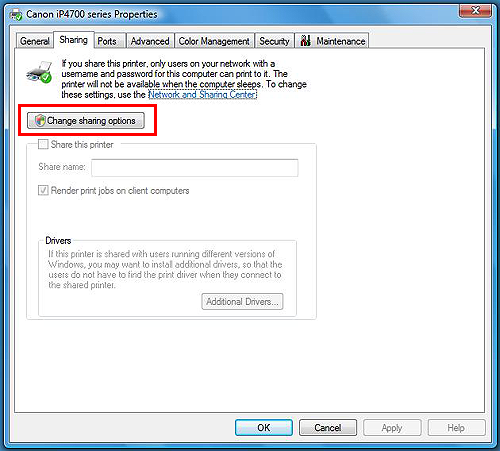
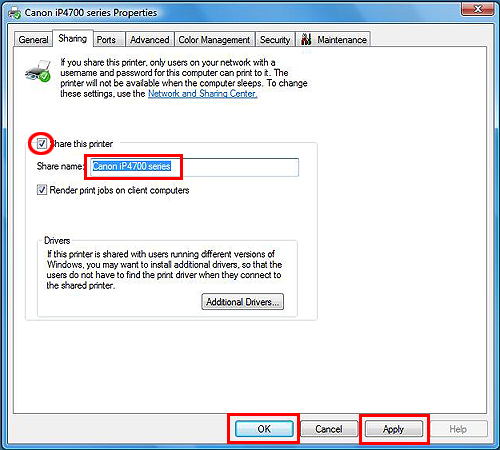
1-4. Select "Share this printer", then enter the name of the printer you want to share in "Share name".
Click "Apply" then "OK" to close Properties.
IMPORTANT
- The Canon iP4700 Series is an example.
- Make sure to write down the "words" you entered in Share name. You will need it when doing the setup for the client server.
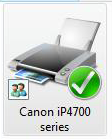
1-5. Confirm that the following kind of icon
is displayed. In this case, the icon indicates that iP4700 series get
ready to be shared.
2. Confirm the full computer name of the print server.
This is necessary when you specify the printer in the step 3 below.
2-1. From the Start menu, right-click "Computer", then click "Properties".
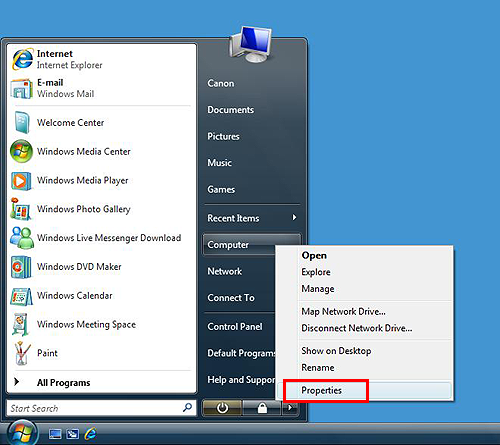
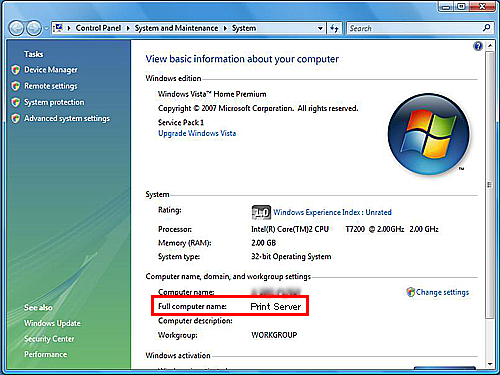
2-2. Confirm "Full computer name".
IMPORTANT
"Print Server" is an example.
Make sure to write down the "words" in Full computer name. You will need it when doing the setup for the client server.
3. Add the printer to the client PC as a new printer.
Make the client PC recognize the printer on the network.
3-1. From the Start menu, select "Computer", "Network", then "Add a printer".
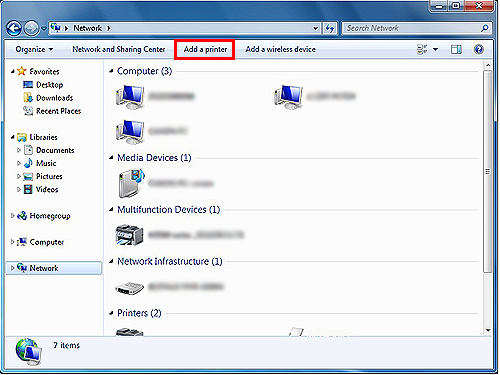
The Add Printer window is displayed.
3-2. Select "Add a network, wireless or Bluetooth printer".
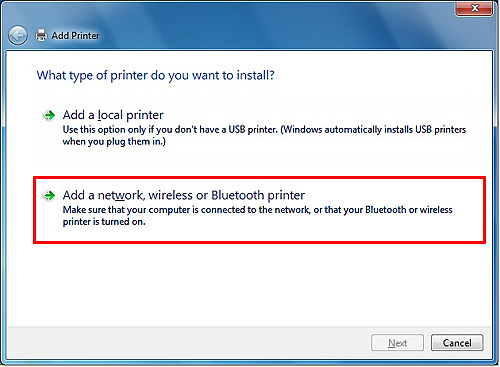
3-3. Click the icon of the printer shared on the print server, click "Next".
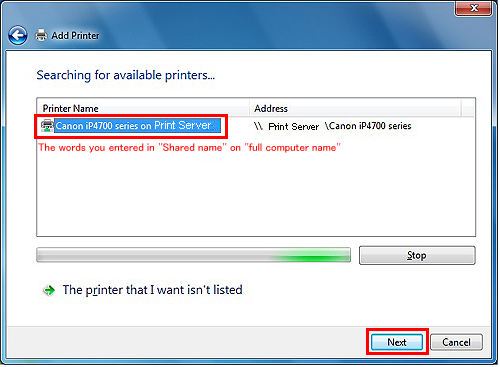
IMPORTANT
If the printer icon is not displayed, check
the connection with the print server. If the problem persists, confirm
whether the account (administrative privileges) of the print server is
surely specified on the client PC.
(It may take time to display the printer icon.)
3-4. After following the instructions on the window, click "Finish".
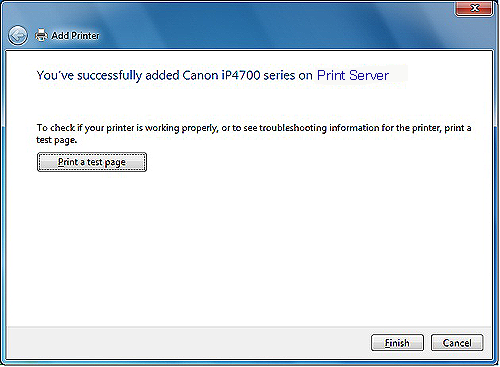
The end of all the settings.
TERJEMAHAN VERSI INDONESIA

(A) Print sever
(B) Client PC
GAMBAR DIATAS SEBAGAI REFERENSINYA
Komputer yang terhubung langsung ke printer dengan kabel USB disebut "Print server" (A) dan komputer tempat operasi pencetakan sebenarnya disebut "Client PC." atau bisa juga sebaliknya (dari perangkat komputer A atau B bisa melakukan perintah cetak ke unit perangkat printer dengan catatan proses cetak bergantian)
<Pengaturan aliran>
Ikuti langkah-langkah di bawah ini untuk mengaktifkan berbagi printer.
1. Lengkapi pengaturan berbagi printer di server Printer.
2. Konfirmasikan nama komputer dari server cetak.
3. Tambahkan printer untuk dibagikan ke PC klien sebagai printer baru.
PENTING !!! HAL INI SERING DILUPAKAN
Masuk sebagai Administrator untuk melakukan pengaturan.
Ketika PC klien adalah Windows 7 dan server cetak adalah Windows 7
Canon iP4700 Series digunakan sebagai contoh printer untuk dibagikan.
- Persiapan -
Server cetak dan PC Klien harus memiliki salah satu driver berikut yang diinstal, yaitu yang diunduh dari situs web Canon atau yang disertakan dalam OS. Driver tempat Anda menginstal tergantung pada printer / OS.
Untuk detailnya, lihat situs web kami.
Untuk menginstal driver yang diunduh di PC klien, centang "Select port printer" di jendela Installation Complete, lalu pilih LPT1 di "Selection Manual" untuk menyelesaikan instalasi.
Untuk menginstal driver yang termasuk dalam OS di PC klien, pilih LPT1 di "Add Printer" untuk menyelesaikan instalasi.
1. Lengkapi pengaturan berbagi printer di server Printer.
Mari kita buat printer terhubung ke server cetak yang tersedia untuk komputer lain.
1-1. Dari menu Start, pilih [Perangkat dan Pencetak].

REFERENSI
Layar terlihat berbeda tergantung pada lingkungan yang Anda gunakan.
1-2 Klik kanan ikon Canon iP4700 Series, lalu pilih "Printer Properties".

1-3 Pilih tab Berbagi, centang "Bagikan printer ini", dan kemudian masukkan nama printer yang ingin Anda bagikan dalam "Bagikan nama".
Setelah Anda memasukkan nama, klik "Terapkan" lalu "OK" untuk menutup Properti.

PENTING
IP4700 adalah contohnya.
Pastikan untuk menuliskan "kata-kata" yang Anda masukkan dalam nama bagikan. Anda akan membutuhkannya saat melakukan pengaturan untuk server klien.
1-4. Konfirmasikan bahwa jenis tanda berikut ditampilkan dalam "Status" di bagian bawah jendela.

2. Ini diperlukan ketika Anda menentukan printer pada langkah 3 di bawah ini.
2-1. Dari menu Start, klik kanan "Computer", lalu klik "Properties".

2-2. Konfirmasikan nama Komputer Lengkap.

PENTING
"Print Server" adalah contohnya.
Pastikan untuk menuliskan "kata-kata" dalam nama komputer penuh. Anda akan membutuhkannya saat melakukan pengaturan untuk server klien.
3. Tambahkan printer ke PC klien sebagai printer baru.
Buat PC klien mengenali printer di jaringan.
3-1. Dari menu Start, pilih "Computer", "Network", lalu "Add a printer".

Jendela Add Printer ditampilkan.
3-2. Pilih "Tambahkan jaringan, nirkabel atau printer Bluetooth".

3-3. Klik ikon printer yang ditentukan pada server cetak, klik "Next".

PENTING
Jika ikon printer tidak ditampilkan, periksa koneksi dengan server cetak. Jika masalah tetap ada, konfirmasikan apakah akun (hak administratif) dari server cetak pasti ditentukan pada PC klien.
(Mungkin perlu waktu untuk menampilkan ikon printer.)
3-4. Setelah mengikuti instruksi di jendela, klik "Selesai".

Akhir dari semua pengaturan.
Ketika PC klien adalah Windows XP 32bit dan server cetak adalah Windows 7 64bit, atau ketika PC klien adalah Windows XP 64bit dan server cetak adalah Windows 7 32bit
Canon iP4600 Series digunakan sebagai contoh printer untuk dibagikan.
Canon iP4600 Series digunakan sebagai contoh printer untuk dibagikan.
- Persiapan -
Server cetak dan PC Klien harus memiliki salah satu driver berikut yang diinstal, yaitu yang diunduh dari situs web Canon atau yang disertakan dalam OS. Driver tempat Anda menginstal tergantung pada printer / OS.
Untuk detailnya, lihat situs web kami.
Untuk menginstal driver yang diunduh di PC klien, centang "Select port printer" di jendela Installation Complete, lalu pilih LPT1 di "Selection Manual" untuk menyelesaikan instalasi.
Untuk menginstal driver yang termasuk dalam OS di PC klien, pilih LPT1 di "Add Printer" untuk menyelesaikan instalasi.
1. Lengkapi pengaturan berbagi printer di server Printer.
Mari kita buat printer terhubung ke server cetak yang tersedia untuk komputer lain.
1-1. Dari menu Start, pilih "Devices and Printers".

REFERENSI
Layar terlihat berbeda tergantung pada lingkungan yang Anda gunakan.
1-2 Klik kanan ikon Canon iP4600 Series, lalu pilih "Printer Properties"

1-3 Pilih tab Berbagi, centang "Bagikan printer ini", dan kemudian masukkan nama printer yang ingin Anda bagikan dalam "Bagikan nama".
Setelah Anda memasukkan nama, klik "Terapkan" lalu "OK" untuk menutup Properti.

PENTING
Canon iP4600 Series adalah contohnya.
Pastikan untuk menuliskan "kata-kata" yang Anda masukkan dalam nama bagikan. Anda akan membutuhkannya saat melakukan pengaturan untuk server klien.
1-4. Konfirmasikan bahwa jenis tanda berikut ditampilkan dalam "Status" di bagian bawah jendela. Dalam hal ini, tanda menunjukkan bahwa seri iP4600 bersiap untuk dibagikan.

2. Konfirmasikan nama komputer lengkap dari server cetak.
Ini diperlukan ketika Anda menentukan printer pada langkah 3 di bawah ini.
2-1. Dari menu Start, klik kanan "Computer", lalu klik "Properties".

2-2. Konfirmasikan nama Komputer Lengkap.
 PENTING
"Print Server" adalah contohnya.
Pastikan untuk menuliskan "kata-kata" dalam nama komputer penuh. Anda akan membutuhkannya saat melakukan pengaturan untuk server klien.
3. Tambahkan printer bersama ke PC klien sebagai printer baru.
Tambahkan printer bersama di jaringan ke PC klien sebagai printer baru.
3-1. Dari menu Mulai, pilih "Printer dan Faks".

3-2. Klik kanan ikon "Canon iP4600 Series", lalu pilih Properti.

3-3. Pilih tab "Ports", lalu klik "Add Port".

3-4. Pilih "Port Lokal", lalu klik "Port Baru".

3-5 Di jendela "Nama Port", masukkan nama printer bersama dengan mengikuti format di bawah ini, lalu klik "OK":
Nama komputer dari nama Print serverShared printer
 REFERENSI
Nama komputer dari server cetak adalah "Nama komputer lengkap" yang Anda konfirmasi pada Langkah 2-2.
Nama printer yang dipakai bersama adalah nama yang Anda masukkan dalam "Bagikan nama" pada Langkah 1-3.
Jika Anda tidak berhasil melakukan koneksi, pengaturan berbagi antara server cetak dan PC klien (pengaturan pada OS) mungkin tidak ditentukan dengan benar.
Dalam hal ini, Microsoft merekomendasikan agar akun dan kata sandi yang sama ditambahkan
ke semua komputer di jaringan.
3-6. Di jendela "Printer Port", pilih "Tutup", lalu klik "Terapkan" → "Tutup" Tutup "Printer ProPerties".


Akhir dari semua pengaturan.
Ketika PC klien adalah Windows XP 32 bit dan server cetak adalah Windows 7 32 bit, atau PC klien adalah Windows XP 64 bit dan server cetak adalah Windows 7 64 bit
Canon iP4700 Series digunakan sebagai contoh printer untuk dibagikan.
- Persiapan -
Server cetak dan PC Klien harus memiliki salah satu driver berikut yang diinstal, yaitu yang diunduh dari situs web Canon atau yang disertakan dalam OS. Driver tempat Anda menginstal tergantung pada printer / OS.
Untuk detailnya, lihat situs web kami.
Untuk menginstal driver yang diunduh di PC klien, centang "Select port printer" di jendela Installation Complete, lalu pilih LPT1 di "Selection Manual" untuk menyelesaikan instalasi.
Untuk menginstal driver yang termasuk dalam OS di PC klien, pilih LPT1 di "Add Printer" untuk menyelesaikan instalasi.
1. Lengkapi pengaturan berbagi printer di server Printer.
Mari kita buat printer terhubung ke server cetak yang tersedia untuk komputer lain.
1-1. Dari menu Start, pilih "Devices and Printers".
 REFERENSI
Layar terlihat berbeda tergantung pada lingkungan yang Anda gunakan.
1-2 Klik kanan ikon Canon iP4700 Series, lalu pilih "Printer Properties"

1-3 Pilih tab Berbagi, centang "Bagikan printer ini", dan kemudian masukkan nama printer yang ingin Anda bagikan dalam "Bagikan nama".
Setelah Anda memasukkan nama, klik "Terapkan" lalu "OK" untuk menutup Properti.

REFERENSI
Canon iP4700 Series adalah contohnya.
Pastikan untuk menuliskan "kata-kata" yang Anda masukkan dalam nama bagikan. Anda akan membutuhkannya saat melakukan pengaturan untuk server klien.
1-4. Konfirmasikan bahwa jenis tanda berikut ditampilkan dalam "Status" di bagian bawah jendela. Dalam hal ini, tanda menunjukkan bahwa seri iP4700 bersiap untuk dibagikan.

2. Konfirmasikan nama komputer lengkap dari server cetak.
Ini diperlukan ketika Anda menentukan printer pada langkah 3 di bawah ini.
2-1. Dari menu Start, klik kanan "Computer", lalu klik "Properties" .2-1. Dari menu Start, klik kanan "Computer", lalu klik "Properties".

2-2. Konfirmasikan nama Komputer Lengkap.
 PENTING
"Print Server" adalah contohnya.
Pastikan untuk menuliskan "kata-kata" dalam nama komputer penuh. Anda akan membutuhkannya saat melakukan pengaturan untuk server klien.
3. Tambahkan printer ke PC klien sebagai printer baru.
Buat PC klien mengenali printer di jaringan.
3-1. Dari menu Mulai, pilih "Printer dan Faks".

3-2. Dari menu file, pilih Add Printer.

3-3. Add Printer Wizard akan ditampilkan.
Klik Selanjutnya.

3-4. Periksa "Printer jaringan, atau printer yang terpasang ke printer lain," lalu klik Berikutnya.

3-5 Centang "Hubungkan ke Printer ini (atau untuk mencari printer, pilih opsi ini dan klik Next)," masukkan nama komputer lengkap dan nama share yang Anda konfirmasikan dalam langkah 2-2 dan 1-3 dalam "nama" masing-masing.
Klik Selanjutnya.
 PENTING
Jika Anda tidak dapat melanjutkan ke langkah berikutnya bahkan setelah mengklik Berikutnya, periksa koneksi dengan server cetak. Jika masalah tetap ada, konfirmasikan apakah akun (hak administratif) dari server cetak pasti ditentukan pada PC klien.
(Mungkin perlu waktu untuk menampilkan ikon printer.)
3-6. Klik Ya.

3-7. Setelah mengikuti instruksi di jendela, klik "Selesai".

Akhir dari semua pengaturan.
Ketika PC klien adalah Windows Vista 32 bit dan server cetak adalah Windows 7 64 bit, atau ketika PC klien adalah Windows Vista 64 bit dan server cetak adalah Windows 7 32 bit
Canon iP4600 Series digunakan sebagai contoh printer untuk dibagikan.
- Persiapan -
Server cetak dan PC Klien harus memiliki salah satu driver berikut yang diinstal, yaitu yang diunduh dari situs web Canon atau yang disertakan dalam OS. Driver tempat Anda menginstal tergantung pada printer / OS.
Untuk detailnya, lihat situs web kami.
Untuk menginstal driver yang diunduh di PC klien, centang "Select port printer" di jendela Installation Complete, lalu pilih LPT1 di "Selection Manual" untuk menyelesaikan instalasi.
Untuk menginstal driver yang termasuk dalam OS di PC klien, pilih LPT1 di "Add Printer" untuk menyelesaikan instalasi.
1. Lengkapi pengaturan berbagi printer di server Printer.
Mari kita buat printer terhubung ke server cetak yang tersedia untuk komputer lain.
1-1. Dari menu Start, pilih "Devices and Printers".
 REFERENSI
Layar terlihat berbeda tergantung pada lingkungan yang Anda gunakan.
1-2 Klik kanan ikon Canon iP4600 Series, lalu pilih "Printer Properties"

1-3 Pilih tab Berbagi, centang "Bagikan printer ini", dan kemudian masukkan nama printer yang ingin Anda bagikan dalam "Bagikan nama".
Setelah Anda memasukkan nama, klik "Terapkan" lalu "OK" untuk menutup Properti.
 PENTING
Canon iP4600 Series adalah contohnya.
Pastikan untuk menuliskan "kata-kata" yang Anda masukkan dalam nama bagikan. Anda akan membutuhkannya saat melakukan pengaturan untuk server klien.
1-4. Konfirmasikan bahwa jenis tanda berikut ditampilkan dalam "Status" di bagian bawah jendela. Dalam hal ini, tanda menunjukkan bahwa seri iP4600 bersiap untuk dibagikan.

2. Konfirmasikan nama komputer lengkap dari server cetak.
Ini diperlukan ketika Anda menentukan printer pada langkah 3 di bawah ini.
2-1. Dari menu Start, klik kanan "Computer", lalu klik "Properties".

2-2. Konfirmasikan nama Komputer Lengkap.
 PENTING
"Print Server" adalah contohnya.
Pastikan untuk menuliskan "kata-kata" dalam nama komputer penuh. Anda akan membutuhkannya saat melakukan pengaturan untuk server klien.
3. Lengkapi pengaturan berbagi-pakai printer di server Printer.
Mari kita buat printer terhubung ke server cetak yang tersedia untuk komputer lain.
3-1. Dari menu Start, pilih "Control Panel", "Hardware and Sound", lalu "Printers".

3-2. Klik kanan ikon "Canon iP4600 Series", lalu pilih "Properties".

3-3. Pilih tab "Ports", lalu klik "Add Port" .3-3. Pilih tab "Ports", lalu klik "Add Port".

3-4. Pilih "Port Lokal" lalu klik "Port Baru".

3-5 Di jendela "Nama Port", masukkan nama printer bersama dengan mengikuti format di bawah ini, lalu klik "OK":
Nama komputer dari nama Print serverShared printer
 REFERENSI
Nama komputer dari server cetak adalah "Nama komputer lengkap" yang Anda konfirmasi pada Langkah 2-2.
Nama printer yang dipakai bersama adalah nama yang Anda masukkan dalam "Bagikan nama" pada Langkah 1-3.
Jika Anda tidak berhasil melakukan koneksi, pengaturan berbagi antara server cetak dan PC klien (pengaturan pada OS) mungkin tidak ditentukan dengan benar.
Dalam hal ini, Microsoft merekomendasikan agar akun dan kata sandi yang sama ditambahkan ke semua komputer di jaringan.
3-6. Di jendela "Printer Port", pilih "Tutup", lalu klik "Terapkan" → "Tutup" di "Printer ProPerties".


Akhir dari semua pengaturan.
Ketika PC klien adalah Windows Vista 32 bit dan server cetak adalah Windows 7 32 bit, atau ketika PC klien adalah Windows Vista 64 bit dan server cetak adalah Windows 7 64 bit
Canon iP4700 Series digunakan sebagai contoh printer untuk dibagikan.
- Persiapan -
Server cetak dan PC Klien harus memiliki salah satu driver berikut yang diinstal, yaitu yang diunduh dari situs web Canon atau yang disertakan dalam OS. Driver tempat Anda menginstal tergantung pada printer / OS.
Untuk detailnya, lihat situs web kami.
Untuk menginstal driver yang diunduh di PC klien, centang "Select port printer" di jendela Installation Complete, lalu pilih LPT1 di "Selection Manual" untuk menyelesaikan instalasi.
Untuk menginstal driver yang termasuk dalam OS di PC klien, pilih LPT1 di "Add Printer" untuk menyelesaikan instalasi.
1. Lengkapi pengaturan berbagi printer di server Printer.
Mari kita buat printer terhubung ke server cetak yang tersedia untuk komputer lain.
1-1. Dari menu Start, pilih [Perangkat dan Pencetak].
 REFERENSI
Layar terlihat berbeda tergantung pada lingkungan yang Anda gunakan.
1-2 Klik kanan ikon Canon iP4700 Series, lalu pilih "Printer Properties".

1-3 Pilih tab Berbagi, centang "Bagikan printer ini", dan kemudian masukkan nama printer yang ingin Anda bagikan dalam "Bagikan nama".
Setelah Anda memasukkan nama, klik "Terapkan" lalu "OK" untuk menutup Properti.

PENTING
IP4700 adalah contohnya.
Pastikan untuk menuliskan "kata-kata" yang Anda masukkan dalam nama bagikan. Anda akan membutuhkannya saat melakukan pengaturan untuk server klien.
1-4. Konfirmasikan bahwa jenis tanda berikut ditampilkan dalam "Status" di bagian bawah jendela.

2. Ini diperlukan ketika Anda menentukan printer pada langkah 3 di bawah ini.
2-1. Dari menu Start, klik kanan "Computer", lalu klik "Properties".

2-2. Konfirmasikan nama Komputer Lengkap.
 PENTING
"Print Server" adalah contohnya.
Pastikan untuk menuliskan "kata-kata" dalam nama komputer penuh. Anda akan membutuhkannya saat melakukan pengaturan untuk server klien.
3. Tambahkan printer ke PC klien sebagai printer baru.
Buat PC klien mengenali printer di jaringan.
3-1. Dari menu Start, pilih "Network", lalu "Add a printer".

3-2. Pilih "Tambahkan jaringan, nirkabel atau printer Bluetooth," lalu klik Berikutnya.

3-3. Klik ikon printer yang ditentukan pada server cetak, klik "Next".


Akhir dari semua pengaturan.
Ketika PC klien adalah Windows 7 dan server cetak adalah Windows Vista
Canon iP4700 Series digunakan sebagai contoh printer untuk dibagikan.
- Persiapan -
Server cetak dan PC Klien harus memiliki salah satu driver berikut yang diinstal, yaitu yang diunduh dari situs web Canon atau yang disertakan dalam OS. Driver tempat Anda menginstal tergantung pada printer / OS.
Untuk detailnya, lihat situs web kami.
Untuk menginstal driver yang diunduh di PC klien, centang "Select port printer" di jendela Installation Complete, lalu pilih LPT1 di "Selection Manual" untuk menyelesaikan instalasi.
Untuk menginstal driver yang termasuk dalam OS di PC klien, pilih LPT1 di "Add Printer" untuk menyelesaikan instalasi.
1. Lengkapi pengaturan berbagi printer di server Printer.
Mari kita buat printer terhubung ke server cetak yang tersedia untuk komputer lain.
1-1. Dari menu Start, pilih "Control Panel", "Hardware and Sound", lalu "Printers".

Jendela Printer ditampilkan.
REFERENSI
Layar terlihat berbeda tergantung pada lingkungan yang Anda gunakan.
1-2 Klik kanan ikon Canon iP4700 Series, lalu pilih "Berbagi". Properti printer ditampilkan.
1-3 Klik "Ubah opsi berbagi" di tab Berbagi.
REFERENSI
Layar terlihat berbeda tergantung pada lingkungan yang Anda gunakan.
1-2 Klik kanan ikon Canon iP4700 Series, lalu pilih "Berbagi".
 Properti printer ditampilkan.
1-3 Klik "Ubah opsi berbagi" di tab Berbagi.

1-4. Pilih "Bagikan printer ini", lalu masukkan nama printer yang ingin Anda bagikan dalam "Bagikan nama".
Klik "Terapkan" lalu "OK" untuk menutup Properti.

Klik "Terapkan" lalu "OK" untuk menutup Properti.

PENTING
Canon iP4700 Series adalah contohnya.
Pastikan untuk menuliskan "kata-kata" yang Anda masukkan dalam nama bagikan. Anda akan membutuhkannya saat melakukan pengaturan untuk server klien.
1-5. Konfirmasikan bahwa jenis ikon berikut ini ditampilkan. Dalam hal ini, ikon menunjukkan bahwa seri iP4700 bersiap untuk dibagikan.

2. Konfirmasikan nama komputer lengkap dari server cetak.
Ini diperlukan ketika Anda menentukan printer pada langkah 3 di bawah ini.
2-1. Dari menu Start, klik kanan "Computer", lalu klik "Properties".

2-2. Konfirmasikan "Nama komputer lengkap".

PENTING
"Print Server" adalah contohnya.
Pastikan untuk menuliskan "kata-kata" dalam nama komputer penuh. Anda akan membutuhkannya saat melakukan pengaturan untuk server klien.
3. Tambahkan printer ke PC klien sebagai printer baru.
Buat PC klien mengenali printer di jaringan.
3-1. Dari menu Start, pilih "Computer", "Network", lalu "Add a printer".

Jendela Add Printer ditampilkan.
3-2. Pilih "Tambahkan jaringan, nirkabel atau printer Bluetooth".
3-2. Pilih "Tambahkan jaringan, nirkabel atau printer Bluetooth".

3-3. Klik ikon printer yang dipakai bersama di server cetak, klik "Next".
 PENTING
Jika ikon printer tidak ditampilkan, periksa koneksi dengan server cetak. Jika masalah tetap ada, konfirmasikan apakah akun (hak administratif) dari server cetak pasti ditentukan pada PC klien.
(Mungkin perlu waktu untuk menampilkan ikon printer.)
3-4. Setelah mengikuti instruksi di jendela, klik "Selesai".

Akhir dari semua pengaturan. SELESAI
Sumber : F.A.Q forum canon support / https://id.canon/en/support/8200718200/6
Demikian cara sharing printer canon yang dapat saya post, jika ada yang ingin menambahkan atau jika terdapat file link error bermasalah, silahkan tulis pada kolom komentar. Mudah - mudahan bisa membantu dan bermanfaat. Terima kasih.


Tidak ada komentar:
Posting Komentar